
You can stop guessing and fix the problem: waterproof concrete basement walls by locating the water source, repairing cracks or joints, and applying the right combination of interior or exterior waterproofing systems. A reliable solution mixes surface preparation, targeted repairs, and either an interior drainage/sump system or an exterior membrane to keep water out for the long term.
Start by assessing where water is entering and how often it happens, then choose the approach that fits your budget and the severity of the issue—simple sealers and patching work for minor seepage, while membranes, exterior excavation, or a drainage system handle persistent leaks and hydrostatic pressure. You’ll learn practical steps for preparing concrete, the pros and cons of interior versus exterior methods, and when to call a professional.
Key Takeaways
- Identify the source and severity of basement water before choosing a solution.
- Prepare and repair concrete thoroughly to make waterproofing effective.
- Match your method—sealer, membrane, or drainage system—to the level of moisture and budget.
Assessing Basement Water Issues
You need to locate where moisture enters, recognise the visible and hidden signs, and decide whether groundwater pressure is causing the problem. Accurate identification guides the choice of repairs: interior patching, exterior drainage, or a combination.
Identifying Sources of Moisture
Start outside. Check downspouts, eavestroughs and grading within 1–2 metres of the foundation for pooling water. Clogged or short downspouts that discharge along the foundation are a common cause of seepage.
Inspect the exterior wall and footing line for cracks, missing parging, or saturated soil after heavy rain. Note locations and conditions on a sketch so you can match outdoor findings to indoor leaks.
Inside, run a short water test with a hose at suspected exterior problem spots while someone watches the interior wall for 10–20 minutes. If water appears where you sprayed, the issue is exterior drainage or cracks rather than interior humidity.
Recognizing Signs of Water Infiltration
Look for active leaks: damp spots, running water, or puddles along the base of walls after rain. Track the time and weather when the leak appears—immediate wetness after rain suggests exterior failure; delayed dampness may indicate groundwater rise.
Watch for persistent mould, musty odour, or peeling paint along walls and baseboards. These are signs you need basement waterproofing rather than a temporary moisture spike.
Use a moisture meter to map wall moisture levels. Readings above normal wood-equivalent percentages or clear wet zones highlight where to focus repairs and whether interior coatings will be effective.
Examining Efflorescence and Condensation
White, powdery deposits on concrete are efflorescence—salts left behind when water evaporates through the wall. Efflorescence tells you water is moving through the concrete but does not by itself quantify flow rate or pressure.
Distinguish efflorescence from condensation. Condensation forms beads or streaks in cool, humid conditions and often appears on colder concrete surfaces. Efflorescence remains as dry, chalky streaks after the wall dries.
Document where deposits occur and how long they persist. Continuous efflorescence plus dampness suggests active water pathways that likely need exterior waterproofing and possibly internal drainage or crystalline sealers to address salt migration.
Determining Hydrostatic Pressure Problems
Hydrostatic pressure occurs when saturated soil pushes against foundation walls and increases with groundwater level. Signs include water entering through floor-wall joints, wet floors away from visible cracks, and bulging or bowing walls.
Check exterior site conditions: poor drainage, a high water table, or nearby lawn irrigation raise hydrostatic load. If the basement floods from the floor or through perimeter seams, interior sealants alone will not solve the problem.
Consider a professional assessment if you observe wall movement, large leaks during storms, or repeat sump pump cycling. Solutions for hydrostatic pressure commonly combine exterior French drains, internal perimeter drains, sump pumps, and repairing the outside membrane.
Preparing Concrete Basement Walls for Waterproofing

Before you apply any waterproofing product, remove loose coatings, fix cracks and joints, eradicate mould, and create a clean, dry surface. Follow specific steps for cleaning, repair, biocide treatment, and surface profile to ensure sealers and membranes bond correctly.
Cleaning and Removing Old Finishes
Start by removing paint, peeling waterproof coatings, efflorescence and loose mortar with a wire brush, putty knife, or a grinding wheel fitted with a masonry cup brush. For large areas, use a power washer at low pressure (≤ 2,000 psi) or a concrete grinder to achieve a clean, roughened surface; avoid high pressure that can damage edges or create microcracks.
Collect and dispose of flaking material and dust. Vacuum the wall with a HEPA-rated shop vac, then wipe with a stiff nylon brush and clear water. Allow the wall to fully dry (often 24–72 hours depending on humidity) before testing adhesion with a small patch of chosen concrete sealer or waterproof coating.
Repairing Cracks and Joints
Inspect walls for hairline cracks, larger through-cracks, and gaps at cove joints and around penetrations. For active leaks use hydraulic cement to stop flowing water; press it into the crack and strike it flush. For non-active cracks, rout out to a uniform V—shape, clean, then fill with a polymer-modified cementitious patch or epoxy injection according to the manufacturer’s instructions.
Address the cove joint where wall meets floor using a flexible urethane or polyurethane caulk designed for foundation movement. Replace deteriorated mortar in block walls and tuck-point using compatible mortar. After repairs cure, sand or grind high spots and clean dust before applying any masonry waterproofing system.
Addressing Mould and Mildew
Test for visible mould growth and musty odours; treat all affected areas rather than spot-treating. Use a biocide or a diluted bleach solution (1 part bleach to 10 parts water) applied with a stiff brush; scrub surfaces, rinse thoroughly, and dry completely. Wear an N95 respirator, gloves and eye protection when handling biocides or bleach.
If mould reappears after treatment, check for ongoing moisture sources such as leaking cracks, poor exterior drainage or a blocked perimeter drain. Consider professional mould remediation for extensive contamination. Only apply waterproof coatings after mould is eliminated and surfaces are fully dry to avoid trapping spores beneath the sealer.
Ensuring Proper Surface Preparation
Confirm the wall’s surface profile matches the coating system’s requirements—some liquid membranes need a textured surface, while cementitious coatings tolerate smoother finishes. Perform a small adhesion test patch using your selected concrete sealer or membrane; follow the product’s cure time and check for peeling after 24–72 hours.
Measure moisture content with a concrete moisture meter or perform a plastic sheet test (tape 1 m² of clear plastic for 48 hours and check for condensation). If moisture is high, delay application until you correct exterior drainage or install interior drainage and a dehumidifier. Finally, mask adjacent areas, protect floor slabs, and ensure ambient temperature and humidity meet the waterproofing product’s specifications before you coat.
Interior Waterproofing Methods
Interior waterproofing focuses on controlling moisture that has already reached the wall or slab and preventing it from damaging finishes or stored items. You’ll use surface sealers, vapour barriers, and drainage systems to stop seepage, control condensation, and direct water to a sump or drain.
Applying Waterproof Paint and Sealers
Use a masonry waterproof paint or crystalline sealer formulated for concrete; products such as masonry-grade elastomeric paints or crystalline compounds penetrate pores and block capillary moisture. Clean the wall thoroughly—remove loose paint, efflorescence, grease and repair cracks with a polymer-modified patch before application. Follow manufacturer instructions for temperature and cure time; many waterproof paints require two coats and at least 4 hours between coats. Apply with a brush or roller for good coverage in block cores and mortar joints. Note that paints like Drylok reduce moisture vapour and light dampness but do not stop water under hydrostatic pressure; use them where seepage is minor or as part of a broader strategy.
Installing Vapour Barriers
A vapour barrier prevents moisture vapour from passing through finished walls and condensing on cold surfaces behind insulation or drywall. Choose a 6-mil polyethylene sheet or certified vapour-retarder membrane; attach it directly to clean concrete using masonry-compatible adhesive or mechanical fasteners and seal seams with waterproof tape. Leave a small air gap if you’ll place rigid foam board insulation against the concrete; this reduces thermal bridging and prevents trapped moisture. Ensure the barrier continues across the sill and ties into any floor drainage or sump area to avoid routing moisture behind finishes. Vapour barriers do not stop liquid water from active leaks, so pair them with repairs or drainage where needed.
Implementing Interior Drainage Systems
Interior drainage collects water at the base of walls and beneath slabs, then routes it to a sump pump or discharge line. Common systems use a perforated PVC pipe (weeping tile) set in a gravel trench along the footing, covered by concrete or a rubble-filled channel, or a shallow channel under the slab with a curtain drain. Install the pipe at the slab edge where the wall meets the floor; slope it toward the sump at 1–2% to ensure flow. Connect to a battery-backed sump pump with a check valve and a discharge line that drains away from your foundation. Interior drainage addresses hydrostatic pressure and active leaks; it complements surface treatments and vapour barriers for a comprehensive interior waterproofing plan.
Exterior Waterproofing Solutions
You can stop water before it reaches your foundation by controlling surface flow, directing roof runoff away from the house, and applying continuous exterior membranes to the foundation wall. Focus on grading, gutters and downspouts, and a properly installed waterproof membrane with an external drainage connection.
Improving Yard Grading and Drainage
Ensure the ground slopes away from your foundation at least 1:100 (1 cm per metre) for the first 1.5–3 metres. Regrade soft spots, remove soil that pushes against the wall, and keep paved areas sloped away from the house.
Install a surface swale or shallow trench to route water around problem areas. Use compacted granular fill under topsoil to prevent long‑term settling that can reverse the slope.
If you have persistent saturation, consider a perimeter footing drain (weeping tile) at the base of the foundation tied to a sump pump or daylight outlet. A correctly installed footing drain collects subsurface water before it undercuts the foundation wall.
Installing Gutters and Downspouts
Keep gutters clean and free of debris; full gutters overflow and concentrate water at the foundation. Inspect and clear gutters twice per year or install leaf guards if nearby trees shed heavily.
Extend downspouts at least 1.5–3 metres from the foundation using rigid pipe or buried discharge lines. Aim the downspout discharge toward a sloped lawn, swale, or storm sewer; avoid directing water toward neighbour properties.
Use splash pads or gravel-filled trenches at downspout ends to reduce soil erosion. Check connections and seals annually and replace corroded or damaged sections to maintain consistent roof runoff control.
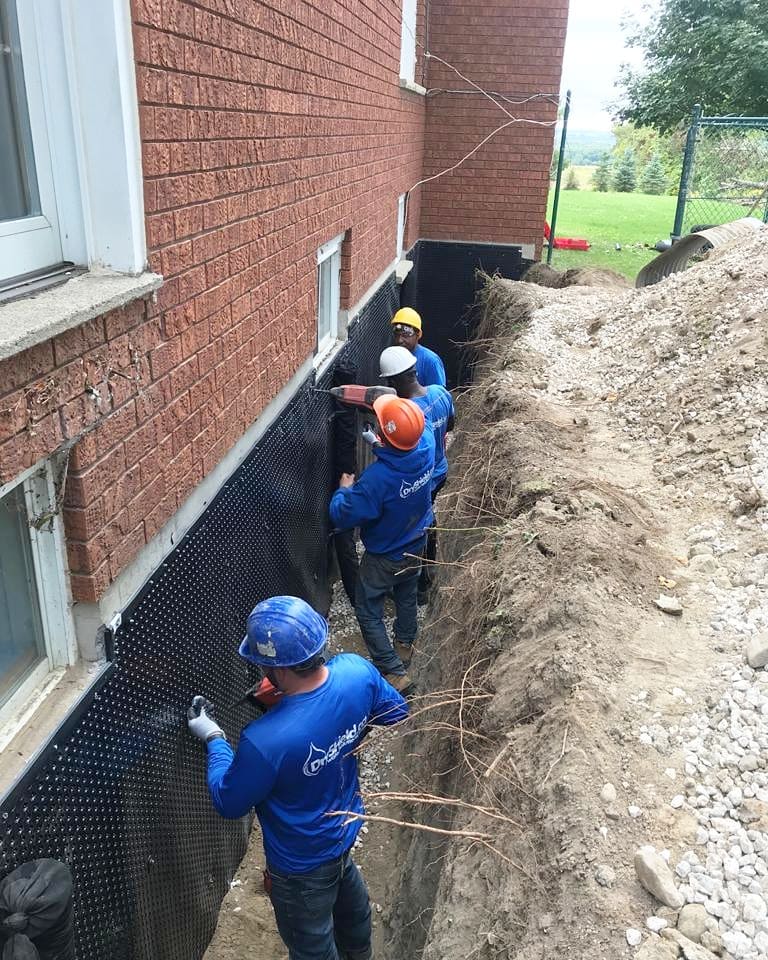
Applying Waterproof Membranes to Exterior Walls
Remove backfill and excavate to expose the foundation wall before applying a membrane. Repair cracks or spalled concrete with hydraulic cement and then apply a continuous waterproof membrane—options include polymer‑modified membranes, self‑adhesive sheets, or liquid‑applied membranes.
Apply membrane from below the final grade to above the top of the footing, overlapping seams per manufacturer instructions. Protect the membrane with a dimple board or protection board to prevent damage from backfill and to create a gap for drainage.
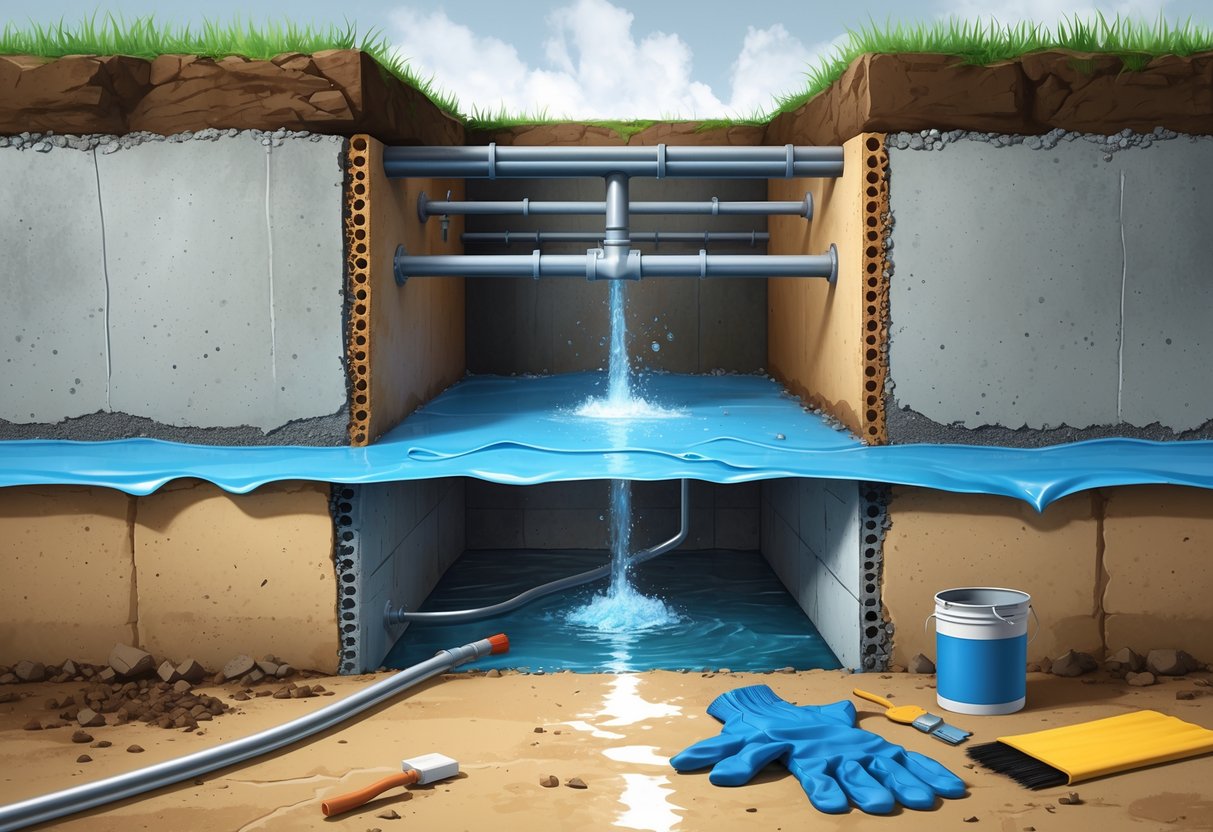
Tie the exterior membrane into the footing drain system so collected water drains to the discharge line or sump. Proper membrane installation plus a footing drain significantly reduces hydrostatic pressure and the risk of seepage through concrete walls.
Basement Drainage and Moisture Control Systems
Proper basement drainage channels water away from the foundation and controls indoor humidity to prevent mould, efflorescence and structural damage. Focus on reliable water removal, adequate discharge, and maintaining relative humidity below 60% to keep concrete walls and finishes dry.
Sump Pump Selection and Installation
Choose a submersible or pedestal sump pump sized for your expected inflow; most residential basements need 1/3–1/2 HP, but higher-capacity pumps (3/4 HP or more) suit high-volume or clay-soil conditions. Verify the pump’s litres-per-minute (LPM) rating and switch type (float, diaphragm, or vertical) to match your pit depth and cycling frequency.
Locate the sump pit at the lowest interior point or where drainage tile collects water. Install a sealed lid to reduce humidity and a check valve on the discharge line to prevent backflow. Discharge water at least 3 metres from the foundation or into a municipal storm connection where allowed; avoid discharging onto neighbouring property.
Plan for redundancy: install a battery backup pump or a secondary pump on a separate float switch if the basement floods frequently or power loss is likely. Test the pump monthly, clear the pit of silt, and wire the unit to a dedicated circuit with a GFCI.
French Drain Implementation
Decide between an interior French drain (perimeter drain tile inside the footing) and an exterior French drain (trenched outside at footing level). Interior systems are less disruptive to landscaping and commonly paired with a sump pit. Exterior drains reduce hydrostatic pressure before water reaches the foundation but require excavation and proper backfill.
Use perforated drain tile (rigid PVC or flexible pipe) wrapped in filter fabric and laid on a bed of clean crushed stone. For interior drains, slope the pipe toward the sump at about 1–2% (10–20 mm per metre). Tie into the sump pit or daylight the line to a dry well or municipal storm system if permitted.
Maintain the drain by keeping ground-grade slopes away from the foundation and ensuring landscaping or driveways don’t block discharge. Inspect access points and flush lines if you detect slow drainage or repeated seepage.
Using Dehumidifiers for Humidity Control
Select a refrigerant dehumidifier sized for your basement’s volume and moisture load; many basements need units rated 20–50 L/day. Look for an automatic pump-out option if you cannot place the unit near a floor drain or slope the condensate to a drain. Energy factor and operating temperature matter—choose models rated for cool basements (down to 5–10°C) to avoid reduced performance.
Place the dehumidifier centrally or near the wettest zone, with at least 30 cm clearance on all sides for airflow. Set the humidistat between 40–55% RH to prevent mould while avoiding overly dry air that can damage wooden finishes. Empty or clean the reservoir regularly and change filters per manufacturer instructions.
Combine dehumidification with source control: keep sump pump discharge sealed, ensure exterior grading and gutters direct water away, and use an interior French drain to stop active leaks. This integrated approach keeps concrete walls drier and reduces long-term moisture-related deterioration.
Costs and Professional Considerations
You will see cost variations based on method, scope and whether you hire a pro. Prioritise solutions that address the root cause—drainage, cracks or exterior water pressure—rather than temporary fixes.
Estimating Basement Waterproofing Cost
Typical basement waterproofing cost in Canada often falls between about $6 and $8 per square foot for comprehensive work, but many projects average around $5,000 depending on size and method. Interior methods (sealants, drainage channels, sump pumps) commonly run lower—often $2–$7 per square foot—while exterior excavation and membrane systems usually cost more due to labour and soil disposal.
Get at least three written quotes that list labour, materials and warranties. Ask contractors to itemize: excavation, exterior membrane, interior drainage, sump pump, crack injection and final grading. Verify whether costs include municipal permits, discharge lines and permanent backfill.
DIY Versus Professional Waterproofing Services
You can tackle small tasks yourself: sealing hairline cracks with epoxy or applying interior sealant are feasible weekend jobs. Expect lower upfront waterproofing cost for DIY, but weigh time, tool rental and the chance of missing structural causes.
Hire professionals when water penetrates through joints, when hydrostatic pressure exists, or when exterior drainage and excavation are required. Professionals offer engineered solutions (weeping tile, exterior membranes, structural crack repair) and often provide warranties. Confirm contractor credentials, references and proof of insurance before you sign a contract.
Long-Term Maintenance and Inspections
Plan routine inspections yearly and after heavy storms. Check sump pump operation, test battery backups, clear discharge lines and inspect interior drainage channels for blockages to protect your waterproof basement system.
Budget for periodic upkeep: sump pump replacement every 5–10 years, resealing joints as needed, and regrading around foundation to keep soil sloped away from walls. Keep records of repairs and invoices; they help when comparing future waterproofing cost versus replacement or upgrades.
Frequently Asked Questions
These answers focus on practical, proven steps you can use to keep concrete basement walls dry: which products to choose, where to apply them, how to repair defects, and how often to reapply treatments.
What are the best methods for sealing basement walls against water penetration?
Use exterior membrane systems when you can access the outside; they block water before it reaches the wall.
Install an interior drainage system (interior French drain) and a sump pump to manage water that reaches the footing.
Apply cementitious or elastomeric waterproof coatings to interior concrete where exterior work isn’t possible.
Consider crystalline admixtures or penetrating silane/siloxane sealers for porous block or poured concrete to reduce water absorption.
Is it necessary to apply a waterproof coating on both the interior and exterior of basement walls?
You don’t always need coatings on both sides, but exterior protection is the most effective first line of defence.
If exterior excavation and membrane installation are feasible, prioritise that work and use interior solutions only for active seepage management.
Use interior coatings or drainage systems when exterior access is impossible or too costly.
Combining exterior membranes with interior drainage gives the best long-term protection for most homes.
Can cracks in concrete basement walls be effectively repaired to prevent water leaks?
Yes. Small non-structural cracks can be sealed with hydraulic cement or epoxy injections to block water paths.
Wider or moving cracks may require structural repair first — such as carbon fibre reinforcement or underpinning — before waterproofing.
Always identify whether cracks are due to settlement, hydrostatic pressure, or structural issues.
Fix the underlying cause; surface patching alone may fail if pressure or movement continues.
How often should waterproofing treatments be reapplied to maintain a dry basement environment?
Liquid-applied membranes and elastomeric coatings typically last 5–10 years depending on condition and product.
Penetrating silane/siloxane sealers often require reapplication every 3–7 years based on exposure and porosity.
Inspect walls annually for new stains, efflorescence, or soft coatings and reapply sooner if you see deterioration.
Sump pumps should be tested twice a year and have a backup system or battery for reliability.
What are the potential consequences of not addressing moisture issues in concrete basement walls?
Ongoing moisture leads to mould and mildew growth, which can harm indoor air quality and aggravate allergies.
You may see efflorescence, spalling concrete, rusting wall ties, and accelerated structural deterioration.
Long-term water pressure can cause bowing walls or foundation movement, increasing repair complexity and cost.
Ignoring moisture can also reduce usable space value and lead to costly emergency repairs later.
What steps should be taken to prepare basement walls before applying a waterproof sealant?
Clean walls thoroughly: remove dirt, efflorescence, paint, and loose concrete using a wire brush, grinder, or pressure washer.
Repair cracks and voids with appropriate materials (hydraulic cement, epoxy, or polyurethane injections) and allow full cure.
Ensure the surface is dry or at the moisture level recommended by the product manufacturer.
Prime porous concrete when required and follow manufacturer directions for temperature, humidity, and application thickness.